Advanced Forms
March 2019 State

Agenda
- Recap: Template Driven & Reactive Forms
- Custom Form Controls
- Nested Forms
- with Form Group Directive
- with Control Value Accessor
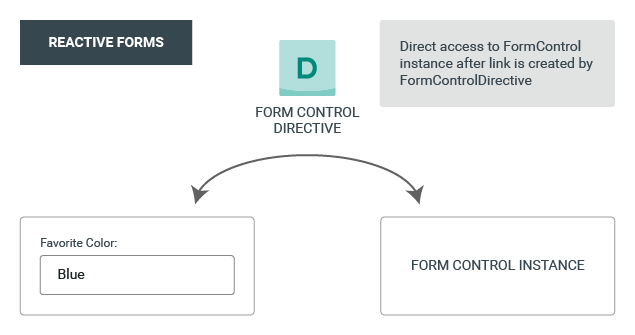
Template Driven & Reactive Forms
Template Driven Forms
Template as the source of truth
- Normally simple forms such as email or sign up form
- They are asynchronous
- Two way data binding
- Testing is more difficult
- They don't scale well
- Use if the forms and forms logic in your app are simple
Template Driven Forms
Example
@Component({
  selector: "app-login",
  template: `


  `
})
export class LoginComponent {
  email = '';

  @ViewChild('form') form: FormGroup;

  submit(value) {
    console.log(value);
  }

}
Template Driven Forms

Reactive Forms
The form model as the source of truth
- More scalable, reusable and testable
- They are synchronous
- Immutable
Reactive Forms
Example
@Component({
  selector: "app-login",
  template: `


  `
})
export class LoginComponent implements OnInit {
  loginForm: FormGroup;

  ngOnInit() {
    this.loginForm = new FormGroup({
      email: new FormControl()
    });
  }

  submit() {
    console.log(this.loginForm.value);
  }

}
Reactive Forms
Template Driven vs. Reactive Forms
| Template Driven | Reactive | |
|---|---|---|
| Form model | HTML template | Defined in a component |
| Data model | Unstructured | Structured |
| Predictability | Asynchronous | Synchronous |
| Form validation | Directives | Functions |
| Mutability | Mutable | Immutable |
Custom Form Control
With Control Value Accessor
CVA - is an interface that acts as a bridge between the Angular forms API and a native element in the DOM.It propagates changes from the model to the view and from the view to the model
Control Value Accessor
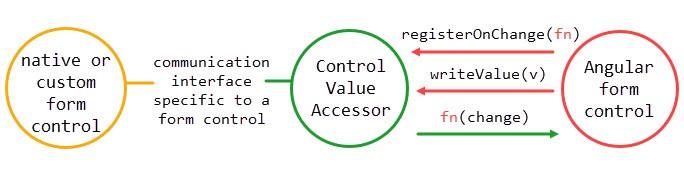
Control Value Accessor
API
// is the method that writes a new value from the form model
// into the view or (if needed) DOM property
writeValue(obj: any)
// is a method that registers a handler that should be called
// when something in the view has changed
registerOnChange(fn: any)
// it registers a handler specifically for when a control receives
// a touch event
registerOnTouched(fn: any)
Control Value Accessor
Implementation steps
- Implement ControlValueAccessor interface and implement its methods
- Register ControlValueAccessor (in a Component)
providers: [
    {
      provide: NG_VALUE_ACCESSOR,
      useExisting: forwardRef(() => CustomComponent),
      multi: true
    }
  ]
Control Value Accessor
Exercise (1/5)
- Pull or fork a repository from here
- Get a master state
- First of all we need to extend our book model:
- Create a genre.ts interface with following fields: id, name, icon
- Add new endpoint in server.ts (GET /api/genres)
- Add genres.json with 4 genres, e.g.: {"id": 1, "name": "IT", "icon": "favorite"}
Control Value Accessor
Exercise (2/5)
- Add to isBook method (server.ts) an extra check if genre is defined
- Add book-genres.service (ng g s book-genres) and implement a method getGenres() which returns a json with genres
- Add BookGenresResolver and implement the resolve method
Control Value Accessor
Exercise (3/5)
- Create a custom control component with a select box (ng g c customized-select-box)
- Define customized select box template - the list should consist of icon and genre
- Use mat-form-field
- Use mat-select fot the list
- Use mat-select-trigger to define how and what should be displayed in the list
- Use mat-option
- Documentation can be found here
- Add BookGenresResolver and implement the resolve method
Control Value Accessor
Exercise (4/5)
- Implement ControlValueAccessor
- To get MatSelect, use a @ViewChild: @ViewChild(MatSelect) matSelect: MatSelect;
- Add field: propagateChange (val: any) => {}
- Add genres (list) and placeholder as Inputs
Control Value Accessor
Exercise (5/5)
- Implement following methods: writeValue and registerOnChange
- You need to add (selectionChange) event to mat-select, implement this method in a component and select the option from the list and trigger propagateOnChange
- You need to register CVA
- Don't forget to register new services and components in the modules
Nested Forms
With Form Group Directive
Control Container looks in the tree for any of these directives (looks for a parent):- ngForm
- FormGroupDirective
- NgModelGroup
- FormGroupName
- FormArrayName
With Form Group Directive
Implementation
viewProviders: [
    { provide: ControlContainer, useExisting: FormGroupDirective }
  ]
With Form Group Directive
Pros & cons
- Pro: quicker to set up
- Con: limited to one forms module
With Form Group Directive
Exercise (1/3)
- Create an order module (ng g m order)
- Create order-overview component (ng g c order-overview)
- This is the parent form - add [formGroup] directive
- Add apply and cancel buttons
- On apply show the form (rawValue) in the console
- Form can be submitted only if it's valid (add a flag submitted)
With Form Group Directive
Exercise (2/3)
- Add general-info component (ng g c general-info)
- Add formGroupName (to the div in the template)
- Add 2 matInputs: with first and last name
- Define viewProviders ( provide: ControlContainer, useExisting: FormGroupDirective })
- Inject parent in the constructor (this.form = parent)
With Form Group Directive
Exercise (3/3)
- Build the form structure in the general-info component
- Use addControl (this.form.form.addControl)
- Add first and lastName controls
- Add required validators for each field
- Add mat-error to the template
- Don't forget all needed imports in the order.module
Nested Forms
With Control Value Accessor
- Pro: Reusable & portable
- Pro: Best practise (Google)
- Pro: Supports many nested levels
- Cons: Implement interface
- Cons: Problems with mat-error in Angular Material (if there is no form, only a control)
With Control Value Accessor
Validation
For Re-validation, the validators will need to be on the top-level form, not at the child component, if you want it to be part of the parent form’s validation.
With Control Value Accessor
Exercise (1/4)
- Add address component (ng g c address)
- Implement Control Value Accessor
- Define form in the template [formGroup]="form"
- Add following fields (as MatInputs): street, zipCode, city
- All the fields are required - add validators and mat-error
With Control Value Accessor
Exercise (2/4)
- Implement CVA methods:
- Define form in the template [formGroup]="form"
- In writeValue use setValue and set emitEvent as false (good for the performance)
- Use valueChanges (from form) to subscribe on changes in the registerOnChange method
- All the fields are required - add validators and mat-error
With Control Value Accessor
Exercise (3/4)
- Implement Validator in providers
- Implement validate method
{
   provide: NG_VALIDATORS,
   useExisting: forwardRef(() => AddressComponent),
   multi: true
}
With Control Value Accessor
Exercise (3/4)
- We need to know in the child if parent was submitted (parent has the submit button)
- Define in child @Input() isParentSubmitted
- Implement OnChanges interface
- We need a workaround in Angular Material to trigger a validation on submit (bug in Angular Material)
   Object.keys(this.form.controls).forEach(key => {
      this.form.get(key).markAsTouched();
   });
With Control Value Accessor
Exercise (4/4)
- Set an Input in parent (order-overview) [isParentSubmitted]="submitted"
-
- Define in child @Input() isParentSubmitted
- Add address as FormControl in parent